Building My First Proxmox Server
The Raspberry Pi cluster worked until it didn’t. Running a dozen Docker services across three Pis means managing thermal throttling, SD card corruption, and the nagging feeling that any one of them could take down three services at once. When I started adding PostgreSQL, MinIO/RustFS, and Jellyfin to the mix, the constraint stopped being theoretical. Time to build something proper.
I’d been using Proxmox on repurposed hardware before, but this time I wanted to design the machine for the job from the start — not just drop a hypervisor on whatever was available.
The case came first
Most builds start with CPU or platform. This one started with the case.
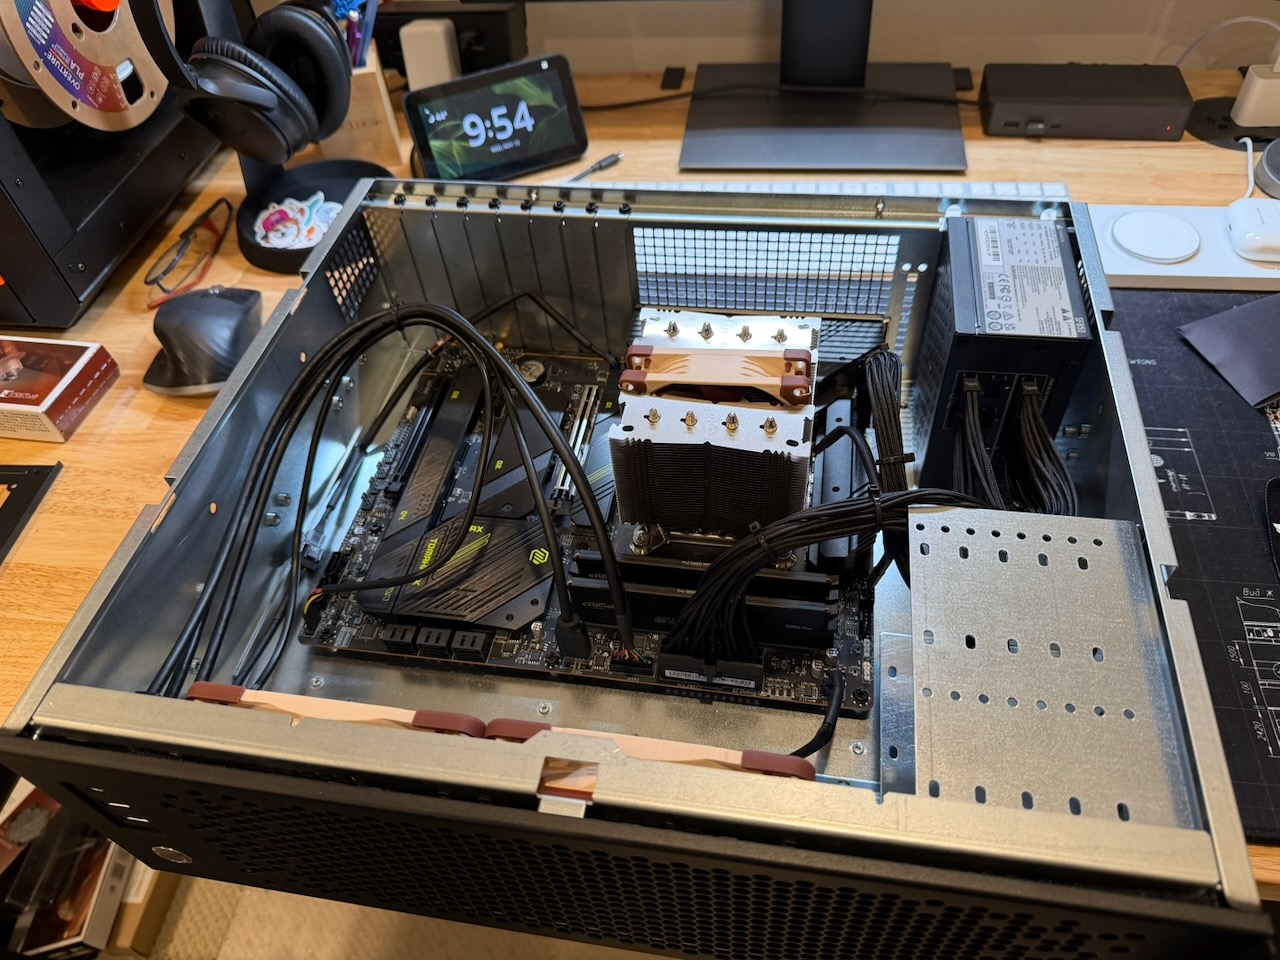
I wanted something rack-mountable but still capable of fitting a full ATX motherboard. The Sliger CX3150x is a 3U rackmount chassis that accepts standard ATX boards — compact enough for a small rack now, with a bigger one in the future plans. The catch is two hard constraints: SFX power supply and a 110mm CPU cooler height limit.
Everything else in the build follows from those two constraints.
CPU: Intel i5-14600K
The Intel Core i5-14600K is a hybrid-architecture chip: 6 P-cores (Raptor Cove) running up to 5.3 GHz boost and 8 E-cores (Gracemont) up to 4.0 GHz, 20 threads total, on a 125W base TDP with a 181W turbo power ceiling.
For a Proxmox server running LXCs, VMs, Docker workloads, and databases simultaneously, I cared about three things:
Single-thread performance. PostgreSQL, Redis, web apps, and containers are mostly latency-sensitive rather than throughput-bound. The 5.3 GHz P-core boost puts the 14600K at or near the top of the single-thread charts regardless of price tier — the i9 variants don’t meaningfully improve on it here.
Enough cores for mixed virtualization. Running 15+ services across containers and VMs exhausts memory before CPU. The 14-core layout gives headroom without the heat and power ceiling of an i9, which starts to matter with a constrained cooler.
Intel Quick Sync. The UHD Graphics 770 handles hardware-accelerated H.264 and HEVC encode/decode, plus AV1 decode, via Intel’s Quick Sync engine. For Jellyfin transcoding this is the difference between zero-CPU-overhead passthrough and maxing out cores on software transcode. No discrete GPU needed, and the integrated graphics adds only a couple of watts to the system’s idle draw.
I looked at the i9-14900K briefly. It adds more E-cores and higher all-core throughput, but Docker services and databases don’t scale linearly with core count — memory and I/O are usually the limits first. And for a compact case with a 110mm cooler, I didn’t want to deal with the extra heat and power consumption. The i5-14600K covered everything I actually needed.
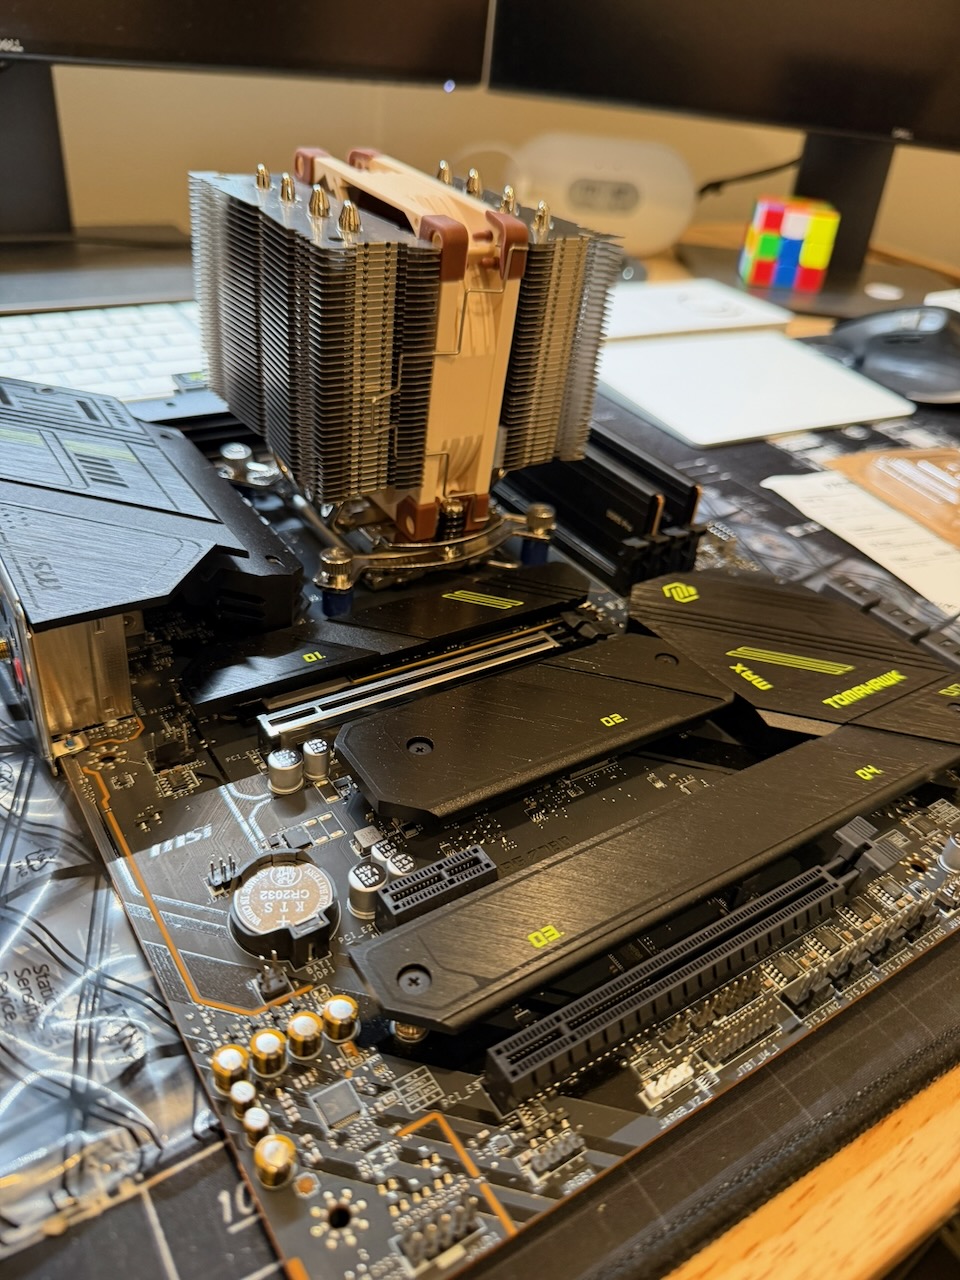
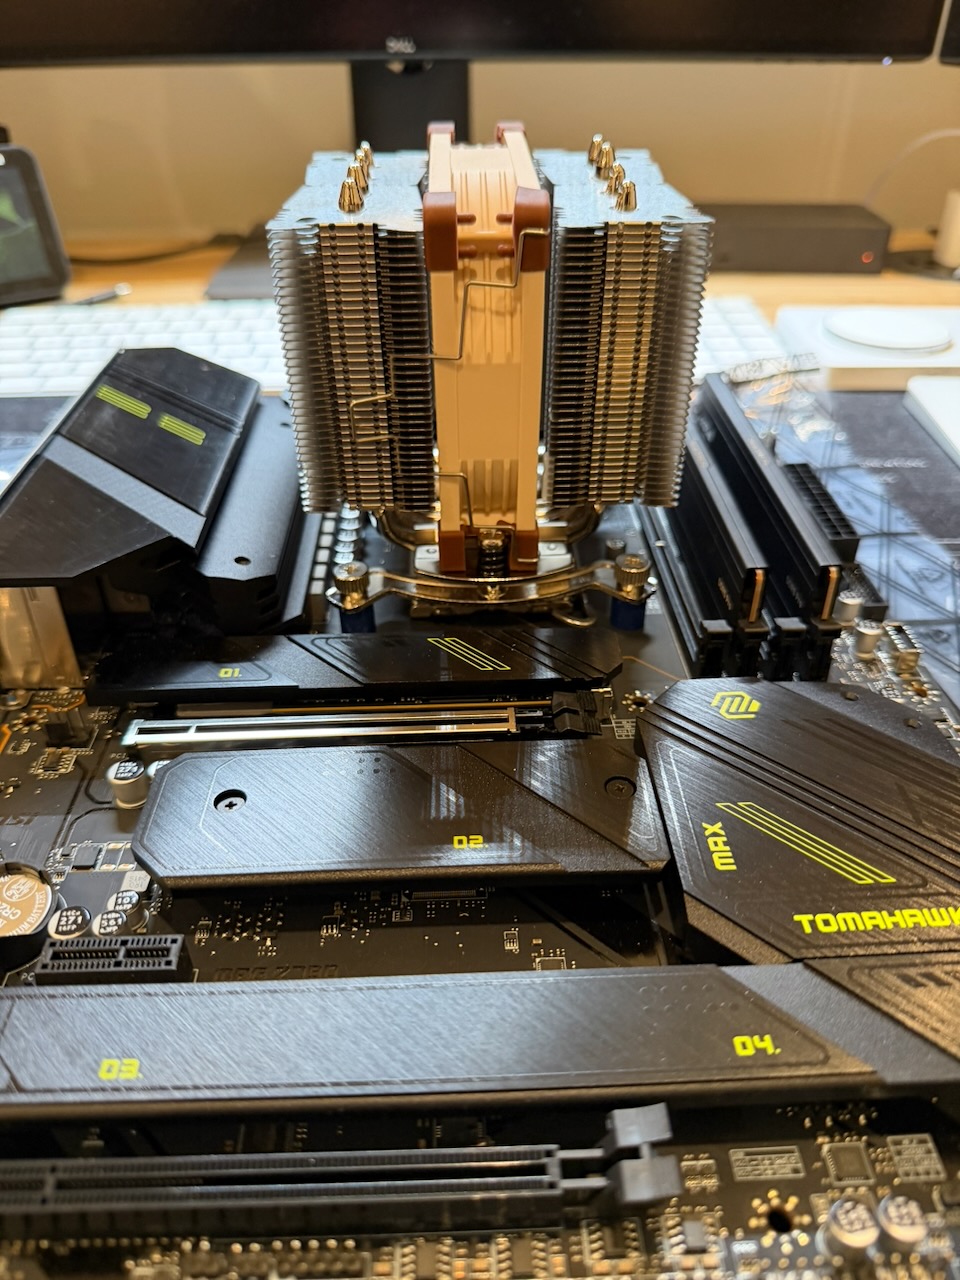
Motherboard: MSI MAG Z790 Tomahawk MAX WiFi
The MSI MAG Z790 Tomahawk MAX WiFi is an ATX Z790 board with LGA1700. On paper it’s a gaming board; in practice it’s a well-specced platform for a server that needs M.2 density, room to grow, and stable voltage delivery under sustained load.
B760 boards would have been cheaper. Most cap at 128GB RAM, have 2–3 M.2 slots, and cut corners on VRM design. Once I added up those tradeoffs, the Z790 Tomahawk was the less risky choice.
Four DDR5 slots, up to 192GB. Starting with 2×48GB and planning to eventually expand to 4×48GB = 192GB, the board needed to actually support this. Several boards I looked at either capped lower or made 48GB DIMM support less clear.
Four M.2 slots. Three drives at launch — OS disk, plus two for the fast pool — with a spare slot for future expansion. One thing to know: the M2_3 slot shares bandwidth with SATA_1 and SATA_2, so mixing M.2 and SATA devices on those ports requires attention. For an all-NVMe config this is a non-issue.
PCIe 5.0 x16 slot, currently empty. Open for a 10GbE card or GPU passthrough when those become relevant.
2.5 GbE LAN (Intel i226-V). Good Linux driver support. 2.5 GbE is enough for current NAS-over-LAN throughput; the PCIe slot is there when it’s not.
16+1+1 phase VRM (CPU rails use a mirrored/doubled arrangement for current delivery). Budget boards run warm under prolonged CPU boost. A server under continuous mixed load is where VRM quality actually shows up.
Memory: Crucial Pro 96GB DDR5 (2×48GB)
The Crucial Pro CP2K48G56C46U5 kit is 2×48GB at DDR5-5600, CL46. Two DIMMs in dual-channel on Z790 trains reliably to 5600 MHz with the XMP 3.0 profile.
Starting at 96GB rather than going straight to 128GB (2×64GB) was intentional. The capacity ceiling with four slots on this platform is 192GB. 4×48GB reaches it cleanly. Starting with two 48GB sticks means the expansion path is adding the same kit — without throwing away existing memory.
The timing tradeoff: CL40 vs CL46 at DDR5-5600 is roughly 14ns vs 16ns absolute latency. For Proxmox running VMs, ZFS, and databases, I was not going to notice that in practice.
Stability under four-DIMM configurations matters far more. High-density kits are more reliably stable at their rated frequency when you leave the system some headroom — chasing minimum latency is not what this box is optimized for.
When running four DIMMs, most Z790 boards will drop XMP from 5600 to 5200 or 4800 MHz for stability. That’s a known tradeoff and acceptable.
ZFS’s ARC is a side benefit of larger RAM. With 96GB installed and workloads using 40–60GB, the remainder becomes adaptive read cache. Frequently accessed data — VM metadata, database pages, inode tables — sits in RAM rather than hitting NVMe.
Storage: three tiers
The workloads split naturally into three groups with different performance requirements, and the storage mirrors that.
Tier 0: Proxmox OS — Crucial P310 500GB
The Crucial P310 500GB is a PCIe Gen4 NVMe rated at 6,600 MB/s sequential read. It holds Proxmox itself — the OS, boot partition, ISO templates. Nothing else lives here.
Separating the hypervisor disk from workload storage keeps the layers independent. If the fast pool needs a drive replaced or a scrub is running, Proxmox is unaffected. Reinstalling or updating Proxmox doesn’t touch VM storage. 500GB is more than enough for the OS; the remainder handles ISOs and small backups.
Tier 1: Fast pool — 2× Crucial T500 2TB (ZFS mirror)
The Crucial T500 2TB is a Gen4 NVMe at 7,400 MB/s sequential read and 7,000 MB/s write per drive, with 1,200 TBW endurance. Two of them in a ZFS mirror become the fast pool — the main workload storage.
This pool holds everything performance-sensitive:
- VM disks
- LXC root filesystems
- PostgreSQL
- Redis
- MinIO/RustFS data volumes
- Service configs and app data
Mirror over stripe was not a close call. A two-drive stripe doubles capacity and combined bandwidth, but one drive failure destroys the entire pool. For active databases and container filesystems, that’s not a recoverable situation. The mirror costs half the raw capacity, gives single-drive redundancy, and still reads faster than a single drive — ZFS can serve reads from either side simultaneously. The 4TB usable is plenty for the current service footprint.
Tier 2: Bulk storage — WD Red Plus 12TB
The WD Red Plus WD120EFGX is a 12TB CMR drive at 7,200 RPM with a 512MB cache and NASWare firmware.
The CMR distinction is important for ZFS. SMR (Shingled Magnetic Recording) drives use overlapping write tracks to hit higher density, but the write-back penalty during sequential overwrites is severe — ZFS scrubs and RAID rebuilds can stretch to days on SMR drives and produce spikes of sustained writes that can shorten drive life. CMR writes directly, no penalty. The WD Red Plus line uses CMR; verify before using any drive in a ZFS pool.
This disk holds bulk, cold, sequential-access data: Jellyfin media, backups, large archives, ISO images. Putting this on NVMe would waste capacity and cost. Keeping it separate from the fast pool means media I/O doesn’t compete with VM disk and database operations.
CPU cooler: Noctua NH-D9L
The CX3150x’s 110mm clearance limit eliminated most coolers. The Noctua NH-D9L fits exactly: 110mm installed height, dual asymmetric aluminum tower, single 92mm NF-A9 fan, rated for ~130W.
The i5-14600K at Intel’s turbo power limits (PL2: 181W) exceeds what the NH-D9L can sustain comfortably. I knew this going in — the plan was always to use the BIOS power preset to keep the CPU within the cooler’s range rather than letting it boost to 181W indefinitely under server load. More on that in the BIOS section below.
Current NH-D9L boxes include the SecuFirm2+ mounting kit for LGA1700 — Noctua updated this in 2021. Mine came with it. If you’re buying old stock, worth confirming before build day.
In practice, P-core temperatures under sustained load sit around 70–75°C at Intel Default power limits. Idle is 30–35°C. Comfortable for a server.
PSU: Corsair SF850 (2024)
The CX3150x requires SFX, which narrows the field. The Corsair SF850 2024 is 850W, fully modular, 80 Plus Platinum (≥92% efficiency at 50% load), and ATX 3.0 / PCIe 5.0 compliant.
The power budget at full turbo load:
| Component | Draw |
|---|---|
| i5-14600K (PL2) | 181W |
| Motherboard / chipset / VRMs | ~35W |
| 3× NVMe drives | ~45W |
| 1× 12TB HDD | ~8W |
| 4× DDR5 DIMMs | ~15W |
| Case fans | ~10W |
| Peak total | ~295W |
850W is more than the peak draw. In the SFX segment the quality options are fewer than in ATX — the SF850 is one of the better-regarded choices, and it runs in semi-passive mode at low load, so at homelab idle the fan is essentially off. The headroom also means adding a 10GbE card or more drives later won’t require revisiting this.
Measured at the wall, idle draw is around 45W — the 14600K drops to very low clocks under light load, and the SF850’s efficiency at low output is good. Under mixed load it runs 120–160W depending on what’s active.
The build
With everything in hand, the build took most of a day — and honestly went smoother than I expected. I’d anticipated the compact case being the awkward part. It wasn’t. The CX3150x is well-designed for what it is.
The motherboard went together on the desk first — CPU, cooler, RAM, and all three NVMe drives installed before the board goes into the case. The M.2 slots under the Tomahawk’s armor plates are easy to access on the desk; inside the CX3150x they’d be harder to reach.
The CX3150x disassembles further than it looks. Getting the ATX board seated requires removing the drive cage first, then lowering the board in flat. The I/O shield snaps into the rear cutout; the standoffs are pre-installed in the correct ATX positions.
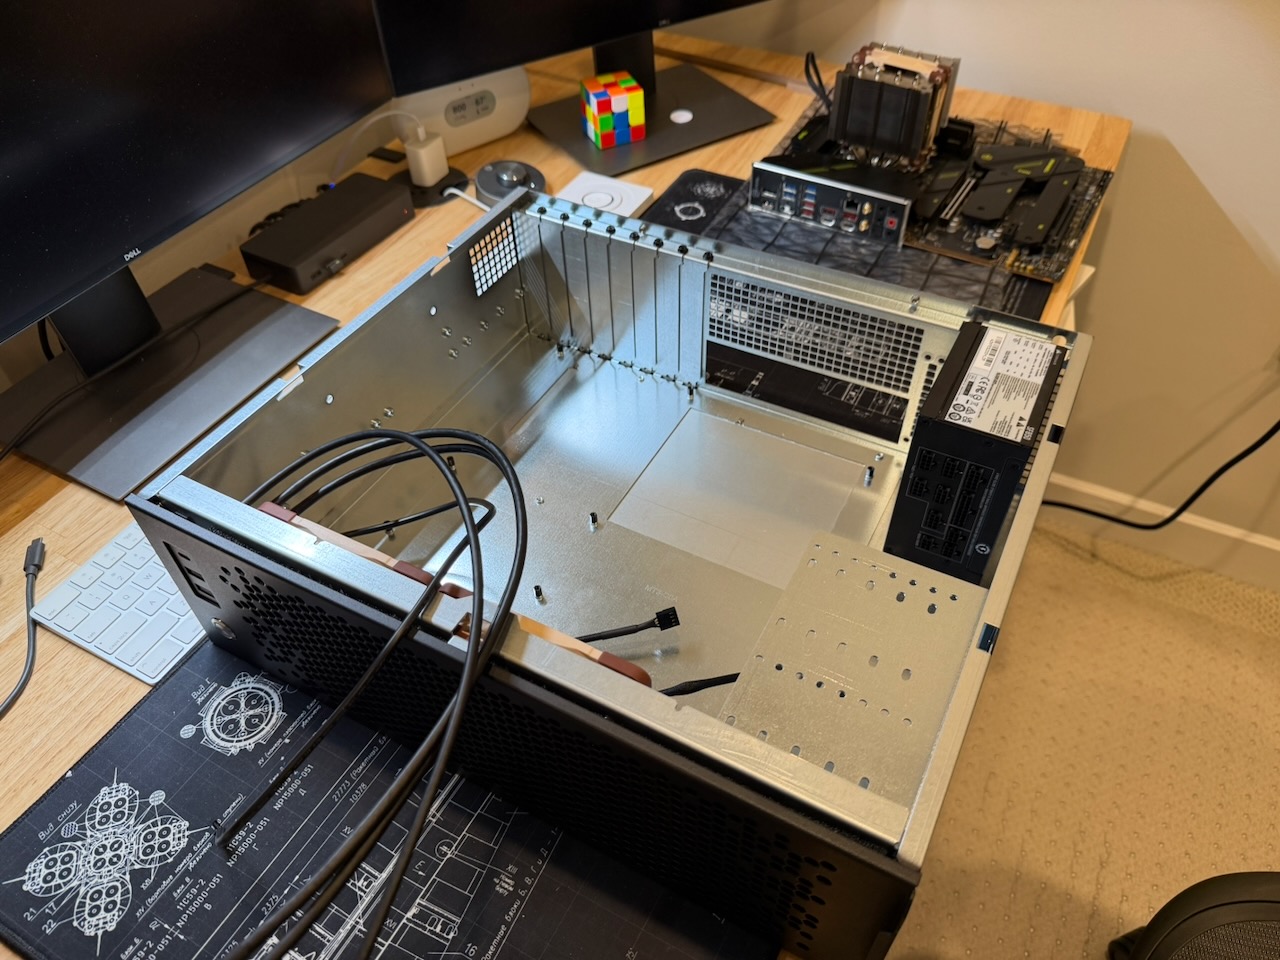
Once the board is in, the clearances are tight. The NH-D9L fits with a couple of millimeters to spare against the case lid. The SF850’s modular cables were critical here — the SFX PSU mounts in a dedicated bracket on the right side, and only pulling the cables you actually need keeps the interior manageable.
The only part that needed patience was cable routing. The CX3150x has routing cutouts, but in a horizontal orientation gravity doesn’t help — cables want to drape across the board rather than run neatly along the sides. Velcro ties, a bit of time.
First boot and BIOS power settings
POST came up cleanly. Z790 detected all the hardware, XMP loaded the RAM at DDR5-5600, all NVMe drives appeared.
The first real decision in the BIOS was the power preset:
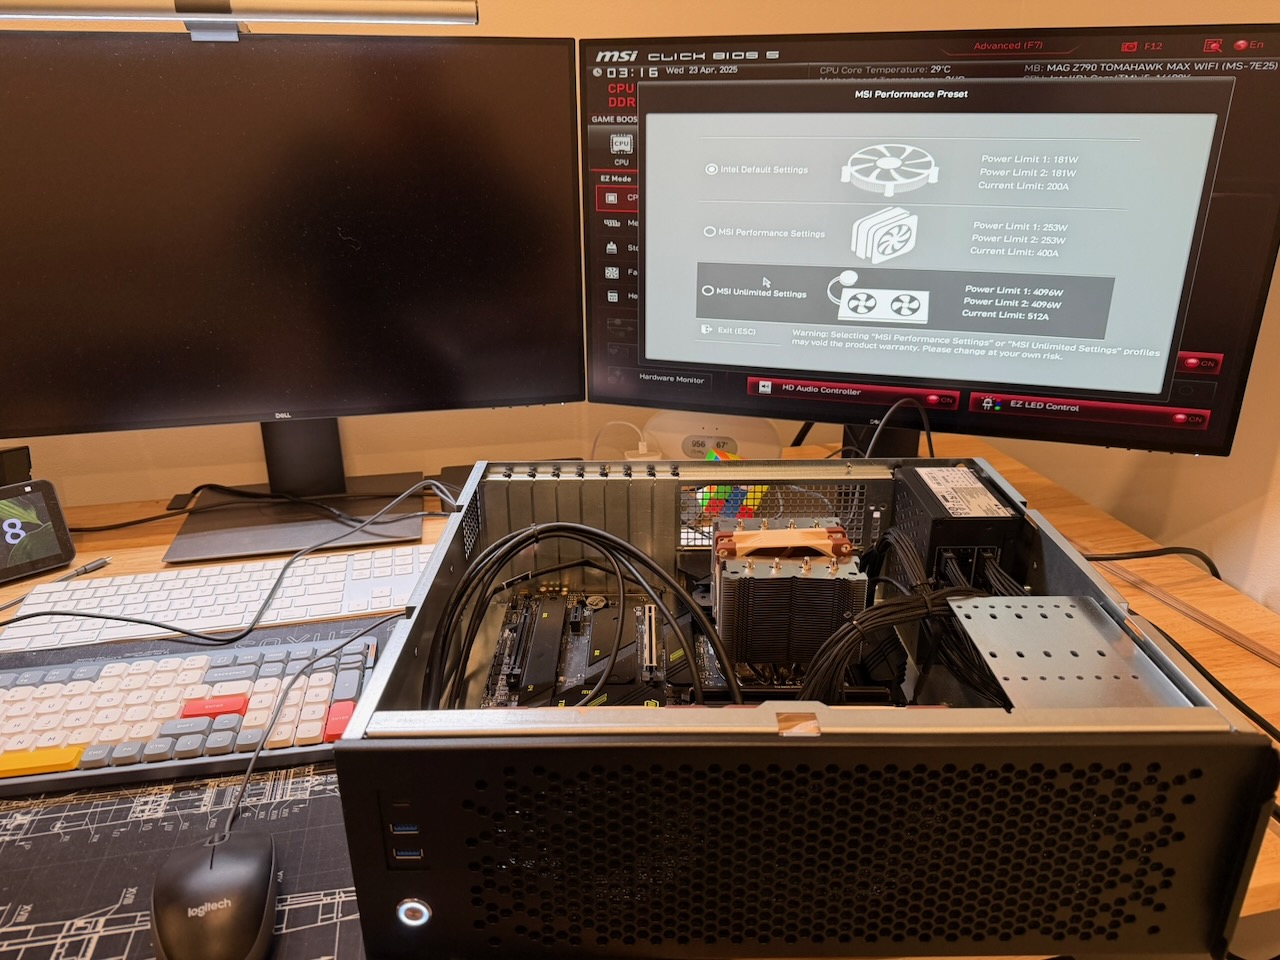
MSI’s BIOS offers three modes:
- Intel Default Settings — PL1: 181W, PL2: 181W, current limit: 200A
- MSI Performance Settings — PL1: 203W, PL2: 253W, current limit: 400A
- MSI Unlimited Settings — PL1/PL2: 4096W (no effective limit)
I chose Intel Default — consistent with the cooler decision. The CPU can briefly boost past the cooler’s sustained rating during short bursts, but under typical server load it settles well within range and the temperatures back that up.
If I were running heavy compile workloads or sustained encoding jobs, I’d reconsider. For Proxmox managing a homelab service stack, Intel Default is the right setting — and the temperatures confirm it.
Proxmox setup and ZFS pools
Proxmox VE installed from USB onto the P310, creating the default rpool on the OS disk. After first boot, the other pools:
1
2
3
4
5
6
7
8
9
10
# Use stable device IDs — /dev/nvme* assignments can shift after a reboot
ls /dev/disk/by-id/ | grep -i nvme

# Fast pool: ZFS mirror across both T500 drives
zpool create fast mirror \
  /dev/disk/by-id/nvme-CT2000T500SSD8_<serial1> \
  /dev/disk/by-id/nvme-CT2000T500SSD8_<serial2>

# Tank pool: WD Red Plus for bulk storage
zpool create tank /dev/disk/by-id/ata-WDC_WD120EFGX_<serial>
Verify the pool topology before putting anything on them:
1
zpool status
1
2
3
4
5
6
7
8
9
  pool: fast
 state: ONLINE
  scan: scrub repaired 0B in 00:00:01 with 0 errors on ...
config:
        NAME        STATE     READ WRITE CKSUM
        fast        ONLINE       0     0     0
          mirror-0  ONLINE       0     0     0
            nvme1n1 ONLINE       0     0     0
            nvme2n1 ONLINE       0     0     0
In Proxmox’s storage configuration (/etc/pve/storage.cfg), I registered both pools:
1
2
3
4
5
6
7
dir: fast
        path /fast
        content iso,vztmpl,images,rootdir

dir: tank
        path /tank
        content backup,iso
VMs and LXC containers go to fast. ISOs, Proxmox backups, and media live on tank. The P310 (rpool) holds only Proxmox system files.
Migration from the Pi cluster
With the storage configured, the actual migration was a matter of recreating the service structure on the new host rather than trying to lift and shift Pi configurations directly.
The setup splits into two tiers. Stateful services that need isolation — PostgreSQL, Redis, Jellyfin, Immich — each get a dedicated LXC container. Docker-based services run in three VMs by role: docker01 for public-facing apps behind Cloudflare Tunnel, docker02 for internal dashboards and personal tools, docker03 for shared infrastructure like Traefik and object storage. Keeping them separate means a bad deploy on a public app can’t take down the internal stack.
Each VM has Docker installed and hosts multiple services. The process was: create the VMs and LXCs, assign static IPs, add them to the spot config. After that, migrating a service meant deploying it to the right target with spot, an SSH-based tool that rsyncs the compose directory and runs docker compose up. A few minutes of downtime per service while DNS flipped to the new IP.
PostgreSQL was the first priority — it runs as a dedicated LXC, not inside Docker. The Pi 4 with USB-attached storage had enough I/O latency to show up in application response times — nothing dramatic, but noticeable. On the T500 NVMe pool it just wasn’t a factor anymore.
Most services moved cleanly — sync the job directory, update any bind mount paths from Pi-local to the new ZFS dataset paths, deploy. A few needed their persistent volumes migrated manually, but nothing required rebuilding configuration from scratch.
The whole migration took a few evenings spread over two weeks. No big-bang cutover, no cascading failures. The thermal throttling and the SD card anxiety that had been constant background noise with the Pis just stopped. That alone made the build worth it.
The deployment tooling is covered in more detail in Running a Homelab.
The machine has been running continuously since November, 2025. One thing I’d do differently: start with 4×48GB RAM rather than 2×48GB. The expansion path works, but adding DIMMs later means a reboot and XMP retraining. Worth doing at build time if you know the target capacity.